TABLE OF CONTENTS
- Introduction
- How to navigate the screen
- Filtering Users
- Revoking Direct Access
- Bulk Actions
- How to Create or Edit Users
- How to Manage "My Profile"
Introduction
The Users section is available for Admin role users, and allows you to manage anything related to other users in the CustomerGauge system. As an Administrator, you can create, edit, and (de-)activate users, and System Administrators can also manage User Groups and Single Sign On (SSO).
How to navigate the screen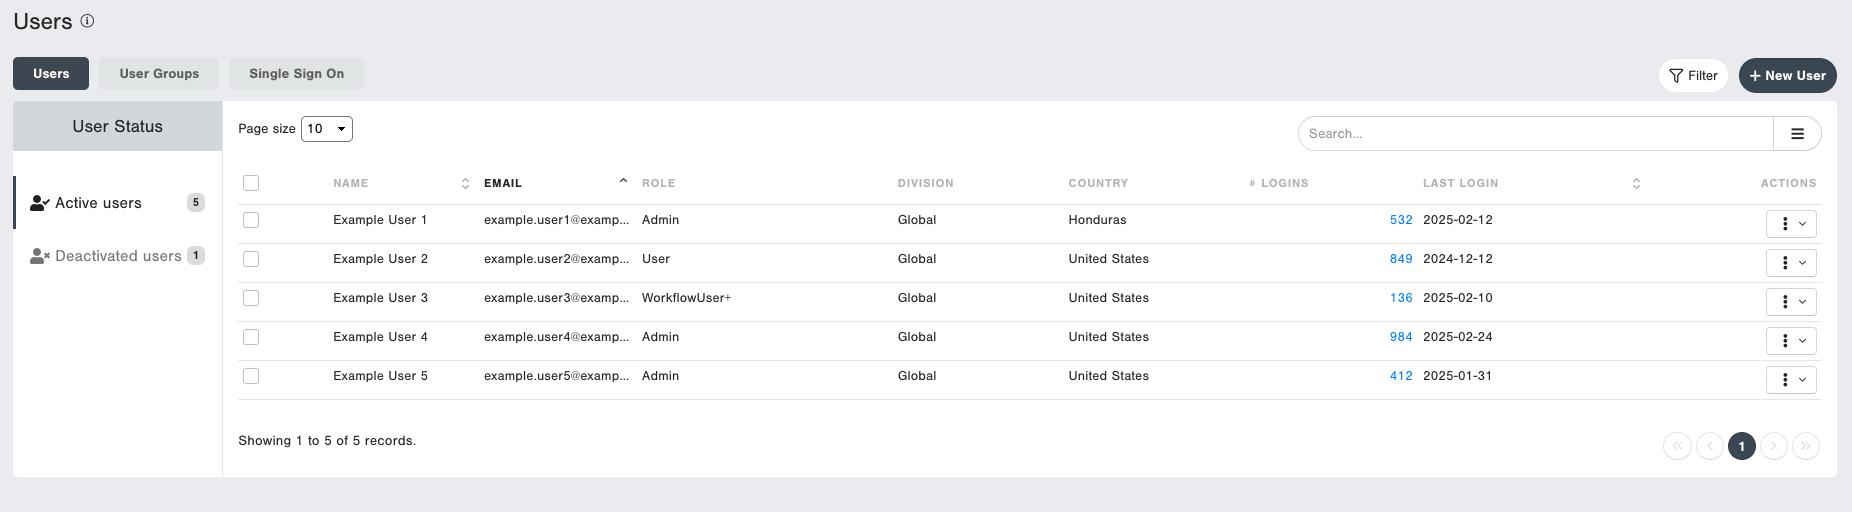
- New User: The New User button allows you to create a new user.
- Filter: Click the Filter button to filter users by Role, Country, Division, or Login Method.
- User status: Click the Active users or Deactivated users tab to toggle between seeing Active users and Deactivated users, respectively.
- Page size: Select a different number to change the number of users that are visible in the table of users.
- Search users: You can search for users in the Search box by searching for the First Name, Last Name, or Email Address of a user.
- Export users: You can export the list of users as a PNG image, or as a CSV file. The PNG export downloads an image of the currently visible page, which can be up to 500 users. The CSV export, on the other hand, is able to export all the users including deactivated users, regardless of filters.
- Bulk Actions: After selecting the checkbox of one or more users, you can take actions to the selected users, such as Activate/Deactivate, or, as a System Administrator, Revoke Direct Access.
- Actions: Clicking the vertical ellipsis button opens a drop-down with the available actions. You can Edit a user, Activate/Deactivate a user, or Revoke Direct Access.
- Pagination: Use the pagination to go to the next or previous list of users.
Filtering Users
You can filter the list of users by a combination of Role, Country, Division, and Login Method. The filter persists across Activated and Deactivated users, as well as the pagination, but does not apply to the CSV export. Press the Apply Filters button to filter your users, or the Clear Filters button to undo the filtering.
Login Methods Filter
You can use the Login Methods “Type” filter to find users that are able to log in with Direct Access, Single Sign-On, or both. As a System Administrator looking to Bulk Revoke Direct Access, you’ll need to filter on "SSO & Direct Access" first.
Revoking Direct Access
Whether you’re already using Single Sign-On (SSO), or starting to use Single Sign-On, there can be moments when you want to revoke someone’s Direct Access, forcing them to log in through SSO only. This action is only available for users that have both ‘SSO & Direct Access’ login methods. If you’d rather want to terminate all access from a user, choose to ‘Deactivate’ that user instead.
To do this, find the "SSO & Direct Access" user that you want to take this action on, and select "Revoke Direct Access" from the action menu. This will then give you a pop-up to confirm that you indeed want to remove the Direct Access from this user. Confirm, and this user will no longer be able to log in using their CustomerGauge credentials the next time they try to log in, leaving SSO the only option available for this user.
Bulk Actions
Sometimes you may need to take actions on multiple users at the same time. Luckily, user management in CustomerGauge allows you to bulk (de-)activate users, or Revoke Direct Access across multiple users at once.
Filter users down to the set of users you’re looking to operate on, and select the checkboxes in front of those users. To match all users visible on the page, you can also select the checkbox at the top, next to ‘Name’.
Bulk Activate / Deactivate

To activate or deactivate multiple users at the same time, select the users you want to take this action on, followed by the "Bulk" action menu that appears on the top-right corner of the screen, and then select "Deactivate" or "Activate", depending on the User Status tab you’re on. A pop-up window will appear to confirm the action.
Bulk Revoke Direct Access

To revoke direct access for multiple users at the same time, select the users you want to take this action on, followed by the "Bulk" action menu that appears on the top-right corner of the screen, and then select "Revoke Direct Access". A pop-up window will appear to confirm the action.
To get to a filtered list of "SSO & Direct Access" users, use the Filter button on the top-right of the screen, and filter the Type to "SSO & Direct Access" under Login Methods.
How to Create or Edit Users
After pressing the "+ New User" button, you’ll find yourself on the Create User screen, or the Edit User screen if you pressed ‘Edit User’. Below, we will outline each of the options.
Selecting Login Method
When creating a new user, you can choose to create the user with Direct Access or SSO Access.
- When selecting Direct Access, the user will receive an email to set up their password. A Direct Access user can still log in with SSO (if set up in your system), as the Identity Provider controls the access through Single Sign-On.
- Select this option if you would like your users to log in with a username and password.
- When selecting SSO Access, the user will not receive an email, and can log in using the SSO Login button of your system's login page.
- Select this option if you would like your users to log in through Single Sign-On.

Login and Security
Username
The username is one of the login credentials that Direct Access users will use to log into CustomerGauge. The username can not be changed once the user is created, and is unique within a hosting region. In most use cases, we recommend using the work email address of the user that you’re creating.
Password
The password gets set up by the user. When the user gets activated, or created as an activated user, they will receive an email with an invitation to set up their password. The password must be set up within 24 hours of receiving the email.
Password Reset
As an Admin, you can press the "Request Password Reset" button to send a new email to the user for them to set up their password. This is only available for users with Direct Access, or both Direct Access & SSO.
MFA
We enforce Multi-Factor Authentication (MFA) for all Admin users to enhance system security. Admins will automatically be prompted to set this up the first time they log in after their Profile is created. Users may optionally enable MFA for themselves from "My Profile" after logging in.
To enhance your account security, we highly recommend other User types also enable Multi-Factor Authentication. To enable this, the User must press the "Enable MFA button" in the Login and Security section of "My Profile". You will need to use an external authenticator app such as Google Authenticator or Microsoft Authenticator. Once this is set up, Admin users in your platform can undo this.
Note: Any Users (including Admins) logging in through Single Sign On are not required to set up MFA.
MFA Reset
As an Admin, you can press the "Reset MFA" button to reset a User's MFA. This will prompt them to follow the Multi-Factor Authentication steps again. This is only available for users with Direct Access.
User Details
First Name
This is the first name of the user you’re creating or editing. It is sometimes used to greet the user.
Last Name
This is the last name of the user you’re creating or editing. It is often used in combination with the First Name to draw context to who the user is.
Country
This is the country that the user operates in or is from, it is an informative field that can help filter your users.
Email address: This is the email address of the user. It is mandatory, must be a valid email address, and when using SSO, the email address in the IdP must match the user in CustomerGauge to link to the correct user.
Telephone number
This is the phone number of the person and must be a valid phone number. There is currently no functionality in CustomerGauge that uses this information.
Access
User Group
This is the User Group that the user will belong to. When using a User Group, you don’t need to fill in the other Access details below, unless you want to make an exception to the Access rules set up in the related User Group. If the group does not have a Role or Division, it must be set up on the individual user level instead.
Feature Access - Role
There are 4 types of user roles (Admin, Users, Workflow+ and Workflow) that control which features the user has access to.
System Admins
While "System Admin" is not a distinct role in the above list, we consider a System Admin any "Admin" who does not have any Data Access restrictions on Division or Segment (explained below) applied.
Data Access - Division
Division controls which "Division" data access the user is restricted to seeing. Division may be represented as a "Hierarchy" in your system. The Division value to restrict access must already exist in your CustomerGauge system in order to select it.
Data Access - Segment access restriction
Segment access restriction allows you to configure one or more Segments, and one or more values in that Segment to restrict that user to see. The segment fields and values to restrict access must already exist in your CustomerGauge system in order to select them.
Preferences
Timezone
This controls in which timezone you see dates and times in. When editing users, they will need to log in again to see the effect of the change. Any of the official IANA timezones are supported.
System Language
This controls which language the user sees the CustomerGauge platform in. When editing users, they will need to log in again to see the effect of the change.
The following languages are supported:
- Bosanski (Bosnian)
- Български (Bulgarian)
- Čeština (Czech)
- Dansk (Danish)
- Deutsch (German)
- Ελληνικά (Greek)
- English (English)
- Español (Spanish)
- Eesti (Estonian)
- Suomi (Finnish)
- Français (French)
- Hrvatski (Croatian)
- Magyar (Hungarian)
- Italiano (Italian)
- 日本語 (Japanese)
- Lietuvių (Lithuanian)
- Latviešu (Latvian)
- Македонијан (Macedonian)
- Norsk Bokmål (Norwegian Bokmål)
- Nederlands (Dutch)
- Polski (Polish)
- Português (Portuguese)
- Română (Romanian)
- Slovenčina (Slovak)
- Slovenščina (Slovenian)
- Shqip (Albanian)
- Srpski (Serbian)
- Svenska (Swedish)
- ภาษาไทย (Thai)
- Українська (Ukrainian)
- Tiếng Việt (Vietnamese)
- 简体中文 (Simplified Chinese)
Report Dispatch Preference
This controls which format reports in the "Scheduled email dispatch" feature will appear.
Auto adjust
This will attempt to include a PNG image in the content of the email, or it will only attach the PNG to the email, if it’s too big to fit in the body of the email. Reports delivered via this setting will also be formatted in our "Classic" Dispatch format, with one widget per row.
PNG
This will attach the full report as a PNG image to the email. The report will be formatted to match the layout of the report as it is viewed directly in the platform as closely as possible, while accounting and adjusting for any widgets that might get "cut off".
This will attach a PDF image to the email, with calculated page breaks to avoid reporting widgets from being cut in the middle of a page break. The report will be formatted to match the layout of the report as it is viewed directly in the platform as closely as possible, while accounting and adjusting for any widgets that might get "cut off".
Exported File Delimiter
This controls with which delimiter CSV files of Widget Exports are created with: Semicolon or Comma.
Activation
Toggle "Activate User" to create the user as an already-activated User (this is the default setting for the toggle), or change the toggle to its deactivated state to create the User without immediately granting access at time of creation.
Active Users
List of users whose access is currently active and can access the CustomerGauge system. Only Users created with the status 'Active User' will get their login information via email. Users that are created and not active will not get their login information via email.
Deactivated Users
Users whose access has been deactivated. These users cannot login to CustomerGauge. Deactivated Users will not receive email reports or other notifications from CustomerGauge.
How to Manage "My Profile"
Click on the My Profile icon on your Menu to see or edit your information, change your password, or configure MFA.
A detailed description of each field's purpose and options can be found above in the Create/Edit Users section.

Change my password
Click on the Change password button to change your password.

Edit My Details
You can edit your User Details and Preferences. You will not be able to change your Username, Role and Access Restriction.

Enabling MFA
To enhance your account security, we highly recommend enabling Multi-Factor Authentication (this is already mandatory for all "Admin" Users, and other User roles may enable it from "My Profile"). To enable this, press the Enable MFA button in the Login and Security section. You will need to use an external authenticator app such as Google Authenticator or Microsoft Authenticator. Once this is set up, Admin users in your platform can undo this.
